Mostrando entradas con la etiqueta Gradient. Mostrar todas las entradas

Nail art | Glitter stars

9.11.15

¡Hola a todos!

Después de todos los diseños tenebrosos que vistéis en Halloween, ahora es hora de crear otros más coloridos no creéis? Por eso opté por crear un diseño con tonos pastel y combinarlo con un esmalte con purpurina, ya sabéis que siempre que puedo le doy un toque de brilli a mis manicuras.
______________________________________________________________________________________________________________________________

Hi sweeties!

After some weeks creating creepy Halloween manicures, it's time to make something more colourful, don't you think? For that reason, I created a nail art using light colours and a glitter!! As you may already know, I try to put some glitter to my nails every time I can.


En este post he decidido hacer un paso a paso para que veáis de forma más fácil como me hice esta manicura. Pero primero os menciono los productos que usé:
  • Meet me at the rink de Color Club
  • Under the black light de Color Club
  • Cotton candy de Rare nails
  • Milk de Rare nails
  • 392 Holographic silver de Flormar
  • Guias en forma de estrellas from Elyt
  • Latex líquido de Elyt
Con el código NAILAVENGERS tenéis un 10% de descuento en todos los productos en www.elyt.es además tiene envíos internacionales.
______________________________________________________________________________________________________________________________

For this post I decided to make a tutorial, this way you can easily see how I did this nail art step by step. But first I want to tell you the products used:
  • Meet me at the rink from Color Club
  • Under the black light from Color Club
  • Cotton candy from Rare nails
  • Milk from Rare nails
  • 392 Holographic silver from Flormar
  • Star vinyls from Elyt
  • Peel off from Elyt
Using the code NAILAVENGERS you can get a 10% off in all the products on www.elyt.es , it has worldwide shipping.


Los pasos de esta manicura son:
  1. Aplicar una capa de esmalte blanco. Aplicar latex líquido al rededor de nuestras uñas para evitar que nuestras cutículas se manchen o estén en contacto con esmalte.
  2. Con una esponja de maquillaje empapada en diferentes tonos de esmalte, damos suaves toques sobre nuestra uña hasta que el degradado este a nuestro gusto.
  3. Colocar la guía en forma de estrella sobre la uña.
  4. Con otra esponja de maquillaje empapada de esmalte de purpurina damos suaves toques hasta cubrir al completo los espacios. Finalmente, sellamos la manicura con Top Coat.
A continuación podéis ver una imagen más de cerca para que veáis con más detalle la manicura y para que observéis como brilla este esmalte holográfico.
______________________________________________________________________________________________________________________________

The steps for this manicure are: 
  1. Apply a white nail polish. Apply some peel of around the nails to avoid the contact of the cuticles with the nail polish.
  2. Apply your chosen colours to a make-up sponge and then dab carefully over your nails until you are satisfied with the result of the gradient.
  3. Put the star vinyls on the nails.
  4. Using another make-up sponge that contains glitter nail polish, dab it over your nails until it covers all the gaps. Finally, apply Top Coat.
Here you can see a macro picture of my nail art and also how the glitter nail polish bright.


El resultado de esta manicura me ha gustado mucho por la combinación de estos tonos con el esmalte de purpurina plateado. Se ve muy alegre y llamativa, ¿no creéis? Espero que os haya gustado el tutorial paso a paso y... recordad que el miércoles tenéis aquí a la Nail Avenger @mireieta_nails con más nail art. ¡Qué vaya muy bién la semana!
______________________________________________________________________________________________________________________________

I love the final result of this nail art me because of the colours that i used and the silver glitter. It's so cute and shinny, don't you think? I hope you like and enjoy it! Remember that you'll find a new post on wednesday of @mireieta_nails. Have a nice week!


Halloween Nails 2015 | Haunted Pumpkin

23.10.15

¡Holaaaa!

Hoy os traigo la última manicura de la semana del Reto Halloween Nails 2015 inspirado en calabazas. Mi anterior manicura del reto no fue muy aterradora así que esta vez me apetecía algo más tenebroso y oscuro, ¿queréis verlo?
______________________________________________________________________________________________________________________________

Helloooo!

Today I bring you the latest manicure of the week of Halloween Challenge Nails 2015 inspired by pumpkins. My previous manicure of the challenge was not very frightening so this time I wanted something more gloomy and dark, would you like to see it? 

Haunted pumpkin | nailavengers

Para mis anteriores manicuras opté por enseñaros un water marble y una manicura freehand pero esta vez he preferido quedarme en mi "zona de confort" y enseñaros un degradado en tonos grises superponiendole un estampado. Me encanta estampar pero me gusta currarme los fondos ya que la manicura queda mucho más vistosa y trabajada.
______________________________________________________________________________________________________________________________

For my previous manicures I decided to show you how to do a water marble and a freehand manicure but this time I prefered to stay in my "comfort zone" and show you a gray's gradient and some stamping. I love stamping but I like to spend time with the base because that way the design looks a lot more colorful and elaborate. 

Haunted pumpkin | nailavengers


Los productos que he utilizado son:

• IsaDora Gel Nail Lacquer 243 Hot Chili (nueva temporada).
• IsaDora Gel Nail Lacquer 249 Turtledove (nueva temporada).
• Esmalte Nº 328 de kiko
• Esmalte Nº 381 de kiko
• Esmalte negro O'Donna para estampar
• Placas BM-222 BM-224 y BM-H07

Adoro estas placas de estampación por la variedad de diseños que tienen y por lo bien que funcionan con cualquier estampador y cualquier esmalte. Los diseños están muy bien marcados y es muy fácil trabajar con ellas.
______________________________________________________________________________________________________________________________

The products I've used are:

• IsaDora Gel Nail Lacquer 243 Hot Chili (new).
• IsaDora Gel Nail Lacquer 249 Turtledove (new).
• 
Nail Lacquer Nº 328 from kiko
• 
Nail Lacquer Nº 381 from kiko
• Black stamping polish from O'Donna

• Satmping plates BM-222 BM-224 and BM-H07

I love these stamping plates because they have too many variety of designs and because they work very well with all the stampers. The designs looks very defined and it is so easy to work with them.

Haunted pumpkin | nailavengers

Para darle un toque más terrorífico, he coloreado los ojos y la sonrisa con el esmalte naranja que usé en el dedo anular, me encanta el efecto que queda!! ^_^

Espero que os haya gustado, no olvidéis visitarnos en instagram y facebook para ver más imágenes de nuestras manicuras.

Que paséis un buen fin de semana! El lunes habrá un nuevo post de Laura sobre esqueletos, estoy deseando verlo!!!!
______________________________________________________________________________________________________________________________

To make it look a little bit more terrifying I have colored the eyes and the smile with orange polish in the ring finger and I'm loving it!! ^_^

I hope you like it and don't forget to visit us on Instagram and Facebook to see more of our nail art.

Have a great weekend!! On Monday you'll see Laura´s post about skeletons and I personally can't wait to see what Laura come up with!


Fama


Halloween Nails 2015 | Pumpkins and spooky trees

21.10.15

¡Holaaaa!

Esta semana para el reto de Marta nos tocan ¡CALABAZAS! Muy típicas de Halloween, ¿Verdad? Lanzo una pregunta random: ¿Sabeis el origen de Halloween? Yo he buscado en Google (el gran sabio google) y es interesante, os animo a que investigueis jajaja. Y ahora, pasemos a lo importante... ¡el diseño!
______________________________________________________________________________________________________________________________

Helloooo!

This week for the Marta  's challenge we have to make pumpkin nails! So ''Halloweeny'' right? Random question: Do you know the origins os Halloween? I googled it (the wise google) and it's so interesting, I encourage you to investigate hahahaha. And now, let's see the design!


Me he decidido por unas calabazas y murciélagos negros sobre un degradado naranja (¿degradado? ¿en serio?). He añadido unos arbolitos tenebrosos jajaja, son muy amigos de las calabazas. Hoy también he usado la estampación, me gusta mucho el resultado, es sencillo de hacer y muy llamativo.
______________________________________________________________________________________________________________________________

I've decided to make an orange gradient with some black pumpkins and bats (gradient? really?). I've added some spooky trees hahaha, spooky trees and pumpkins are friends. Today I've used again the stamping technique, I love the result, it looks simple and eye catching.


Así es como se ven bajo luz negra, ¡Me encanta! Perfecto para una fiesta de Halloween.
______________________________________________________________________________________________________________________________

That's how it looks under blacklight, I love it! Perfect for a Halloween party.

Estos son los productos que he usado:

- MESS NO MORE! liquid latex de Minimanimoo: Con mi código ''COTTONSUGAR'' tendréis un descuento de 2$ en vuestro Mess No More!
- IsaDora Gel Lacquer ''243-Hot Chili''
- China Glaze ''Sun Of A Peach''
- Maybelline ''Sun Flare''
- UberChicBeauty stamping plate ''Halloween 01''
- Esmalte negro de estampar de MundoDeUñas
______________________________________________________________________________________________________________________________

These are the products I've used:

- MESS NO MORE! Liquid latex from Minimanimoo: Use my code ''COTTONSUGAR'' for 2$ off.
- IsaDora Gel Lacquer ''243-Hot Chili''
- China Glaze ''Sun Of A Peach''
- Maybelline ''Sun Flare''
- UberChicBeauty stamping plate ''Halloween 01''
- Black stamping polish form MundoDeUñas


Espero que os haya gustado, ha sido un post cortito pero intenso jajaja. No olvideis pasaros el viernes a ver la super mani de super Fami (jajajaja no me mates Fama! Te quiero!). Agur! (Adios en vasco jiji)
______________________________________________________________________________________________________________________________

I hope you like it, it has been a short but intense post lol. Don't forget to check out Fama's post on Friday! Byee!


María.

Halloween Nails 2015 | Witch's Haunted House

7.10.15

¡Holaaaa!

Como ya os comentó Laura W. en el post anterior, las NailAvengers nos hemos unido al reto Halloween Nails 2015 que ha organizado Marta. Cada semana hay una nueva temática hasta el día de Halloween, y esa misma semana habrá tres propuestas diferentes (copio/pego su explicación jijiji).
Esta semana nos toca el tema ''brujas''. ¿Preparad@s?
______________________________________________________________________________________________________________________________

Helloooo!

As Laura W. said in the previous post, the Nail Avengers decided to join the Halloween Nails 2015 challenge that Marta organised. Each week there will be a new theme until the Halloween day, and each week you'll have three different nail arts (copy/paste from Laura's explanation hahaha). This week's theme is ''Witch'', Ready?


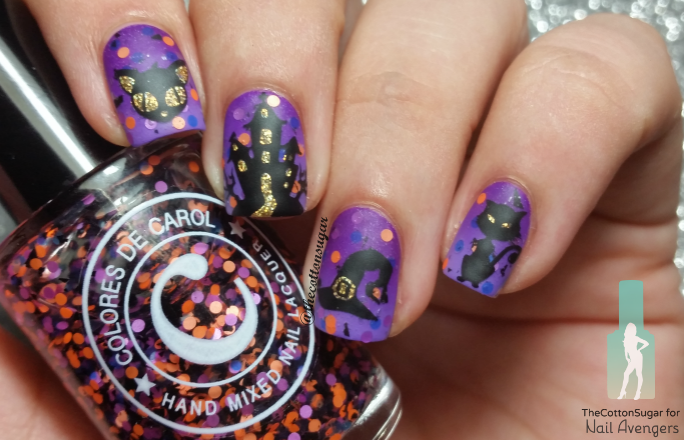
Para este post he decidido hacer un poquito de stamping + degradado, dos de mis técnicas preferidas jajaja. Los dibujos son un poco random, aunque todos tienen que ver con brujas y Halloween ;) hay gatos negros, un sobrero de bruja y casas encantadas. No se porqué, pero ¡me encanta Halloween! ¿Y a vosotr@s? He hecho una versión brillante y otra mate.
______________________________________________________________________________________________________________________________

For this post I've decided to make a little bit of gradient + stamping, two of my favorite techniques hahaha. The images are random, but they're Halloween and witches related ;) there are two black cats, a witch hat and two haunted houses. I don't know why, but I love Halloween! And you? I've done a glossy version and a matte version.


Os cuento un poquito los productos que he usado. Los esmaltes son: Color Club ''Pucci-licious'', ''Disco Dress'' (de ELYT), Colores De Carol ''Cheshire'', ''80's Fever'', F.U.N Lacquer ''Million Dollar Dream''  y el negro de estampar el ''Black'' de MundoDeUñas. El estampador y la placa de estampar ''Halloween 01'' son de UberChicBeauty, para proteger alrededor de la uña he usado MessNoMore ''celo liquido'' o latex. Como es un diseño un poco más elaborado de lo normal, haré un tutorial para instagram (@thecottonsugar). Os dejo por aquí abajo códigos de descuento para algunas de las webs que he mencionado:

  • MESS NO MORE! liquid latex de Minimanimoo: Con mi código ''COTTONSUGAR'' tendréis un descuento de 2$ en vuestro Mess No More! 
  • ColoresDeCarol: Con mi código ''COTTONSUGAR'' tendréis un descuento del 10% en vuestra compra.
  • ELYT: Con mi código descuento ''THECOTTONSUGAR'' tendréis un descuento del 10% en vuestra compra superior a 20€.
______________________________________________________________________________________________________________________________

Let's talk about the products I've used. The colors are: Color Club ''Pucci-licious'', ''Disco Dress'' (from ELYT), Colores De Carol ''Cheshire'' and ''80's Fever'', F.U.N Lacquer ''Million Dollar Dream'', and the blanck stamping polish is from MundoDeUñas. The stamper and stamping plate ''Halloween 01'' are from UberChicBeauty. I'll post a tutorial on my instagram soon (@thecottonsugar). These are some discount codes for some of the webs I've mentioned, feel free to use them ;)

  • MESS NO MORE! liquid latex from Minimanimoo: Use my code ''COTTONSUGAR'' for 2$ off at WWW.MINIMANIMOO.COM
  • ColoresDeCarol: Use my code ''COTTONSUGAR'' fro 10% off.
  • ELYT: Use my code ''THECOTTONSUGAR'' for 10% off (orders over 20€)


Bueno, ya veis que es un poco random. Os dejo un macro de la casa encantada, por si quereis pasar a ver la distribución de las habitaciones, está en alquiler jajaja.

¿Qué os parece? ¿Qué opináis de Halloween? Bueno, espero que os guste y que os paséis el viernes por aquí para ver el precioso diseño de Fama  ;) ¡Un beso brujil!

*Quiero dar las gracias a mis amigas por ayudarme con los posts, especailmente a Laura W., que tiene una paciencia de santo jaja.
______________________________________________________________________________________________________________________________

Well, as you can see is a random design. I leave a macro of the haunted house, if you wanna go inside and see the distribution of the rooms... it is for rent LOL.

Do you like it? what do you think about Halloween? I really hope you like it! and don't forget to check out Fama's post on Friday ;) A witchy kiss!

*I wanna thank my friends for helping me with the posts, specially Laura W., who has the patience of a saint. 


María.

Halloween Nails 2015 | Elphaba got her nails done.

5.10.15

¡Hola a todos!

Hace relativamente pocos días las Nail Avengers decidimos apuntarnos al reto Halloween Nails 2015 que ha organizado Marta. Nuestro primer reto juntas, y la verdad es que nos hace mucha ilusión ♥. Cada semana hay una nueva temática hasta el día de Halloween, y esa misma semana habrá tres propuestas diferentes. El tema para nuestras uñas esta semana es brujas, espero que estéis preparados para algunos nail arts espeluznantes haha.
¡Vamos con mi manicura de bruja!
______________________________________________________________________________________________________________________________

Hi everyone!

A few days ago Nail Avengers decided to join the Halloween Nails 2015 challenge that Marta organised. It's our first challenge together, and we're super excited to share our nails with you ♥. Each week there will be a new theme until the Halloween day, and each week you'll have three different nail arts. For the first week the theme is witches, so I hope you're ready for some spooky nails, haha.
Let's see my witch nails!

¿Qué pasa cuando Elphaba, la bruja de Wicked (O la de Mago de Oz) va a que le pinten las uñas? Pues estoy segura de que pide que le hagan un nail art así, sencillo pero que vaya con su personalidad. No hay nada que quede mejor con una piel de bruja verde que un esmalte negro, pero todas sabemos que hay que ser un poco más original, por eso se ha atrevido con un degradado de verde lima a negro, con un toque de glitter verde.
______________________________________________________________________________________________________________________________

Do you know what happens when Elphaba, the witch from Wicked (or the Wizard of Oz) goes to have her nails done? I'm pretty sure that she asks for a nail art like this one, simple but that goes with her personality. There's nothing like black nail polish for a witch with a green skin, but some of us like to be a little more original than plain nail polish. That's why she went for a lime green to black gradient with a touch of green glitter.

Me ha contado que se quedó con todos los detalles mientras le hacían el nail art, para después poder recrearlo ella en casita. Los tres esmaltes que usaron para el degradado fueron: Mojito de Ciaté, 496 de la colección PZN de Colour Alike, y el Kind of Black de Colour Alike también. Tras pintar todas sus uñas con el verde lima pusieron los tres colores en ese orden en una esponjita de maquillaje y dieron toques suaves encima.
______________________________________________________________________________________________________________________________

She told me that she paid atention to every detail while they painted her nails, that way she could recreate it with her own polishes at home. The polishes they used to do the gradient are: Mojito from Ciaté, 496 of the PZN collection from Colour Alike and Kind of Black from Colour Alike. After painting all her nails with the lime green, they put the three colours over a make up sponge and dabbed lightly over her nails.

Finalmente añadieron el glitter que veis en la foto desordenadamente sobre la punta de las uñas, dónde quedaba el negro del degradado, para darle un aspecto más brillante y mágico. Le encantó tanto que se llevó el glitter a casa para descubrir dónde más podía utilizarlo. ¡Por cierto! Un detalle muy muy importante con el que se quedó es aplicar top coat después del degradado y del glitter, así hacemos el nail art más duradero y el glitter quedará integrado con el resto.

¿Qué os ha parecido el nail art? ¿Ideal para una bruja un poco más moderna? Espero que os haya gustado la idea y no dejéis de pasar por el blog, el miércoles habrá otro nail art brujil de María. ¡Que paséis buena semana!
______________________________________________________________________________________________________________________________

Finally they added the green glitter you can see on the photo, they did it in a messy way on the tip of the nails, where the black of the gradient is. It gives it a shiny and magical look, don't you think? She loved it so much that she took the glitter home to discover where could be used. By the way, a very very important detail that she remembered... You have to apply top coat after the gradient and the glitter to make the nail art last longer, and also to settle in the glitter with the rest.

What do you think of the nail art? Do you like it for a modern witch? I hope you liked the idea and don't miss wednesday post, there will be another witchy design by Maria. Have a great week!


Laura W.


Nail art | Sweet and shiny gradient.

28.9.15

¡Hola a todas!

Me presento, mi nombre es Laura de @sweetfactionails en Instagram, soy de Barcelona y actualmente estudio Química en la universidad. Desde pequeñita me encantaba esmaltar mis uñas pero fue hace unos cuatro años cuando empecé a experimentar en el mundo del nail art. Cuando descubrí algunas técnicas y cuidados, decidí abrir mi propia cuenta en Instagram y al año, mi propio blog Sweetfactionails. Otra de mis aficiones es ir de compras. ¡Amo la moda!
_______________________________________________________________________________________________________________________________

Hi lovelies!

This is Laura the nail artist behind @sweetfacionails on Instagram. I’m from Barcelona and I’m currently studying Chemistry at university. Since I was a little girl I enjoyed painting my nails, but it wasn’t til four years ago that I decided to jump into the wonderful world of nail art. After working for a while learning some techniques and nail care I decided to open my own Instagram account and one year later my blog Sweetfactionails. Do you want to know another crazy hobby I got? Go shopping! I absolutely love fashion!!

Opté por una manicura con la técnica Stamping porque es una de mis favoritas y como no, combinada con…¡muchos brillantitos! Sí, soy amante de la decoración 3D.
Para mi primera entrada en el blog, he decidido crear una manicura que me identifique creando un degradado usando tonos de esmaltes de mis colores favoritos, rosa y azul. Además añadí un diseño sencillo de estrellas en blanco y creé una accent nail llena de brillantes plateados.
_______________________________________________________________________________________________________________________________

The manicure I chose to introduce myself to you is made using the Stamping technique, which is from far one of my favourite and why not?! I added some diamonds to make it Shiny, shiny! Yes, I must admit it, I’m a lover of 3D nail decoration.
So this is my first post in the NA blog and for this very special occasion I chose gradient nails using the colours that identify me the most: pink and blue. I also added a simple star design in white and created an accent nail full of silver diamonds. 

Para el degradado, primero apliqué una capa de esmalte blanco y latex líquido alrededor de mis uñas. Apliqué sobre la esponja los esmaltes ‘Rave’ de Claire’s, ‘Feathered hair out to there’ y ‘Meet me at the rink’ de Color Club, ‘Cotton candy’ de Rare nails y ‘Blueberry’ de Barry M. y, seguidamente di suaves toques sobre la uña. El estampado de estrellas lo hice con la técnica Stamping usando la placa 004 de Curali Nail Stamping.
_______________________________________________________________________________________________________________________________

First step: Create the gradient nails. I applied a coat of white polish and some latex all around my nails. Then I applied on a sponge the following nail polishes ‘Rave’ from Claire’s, ‘Feathered hair out to there’ and ‘Meet me at the rink’ from Color Club, ‘Cotton candy’ from Rare nails and ‘Blueberry’ from Barry M. and finally applied them by gently touches on my nails. 

Para terminar, mi elección fue cubrir al completo de diamantes una uña. Primero, apliqué una capa de esmalte de purpurina plateado (‘Confetti’ de Ciaté London) y, sin dejarlo secar, añadí con la ayuda de la dotting tool cada uno de los brillantes hasta completarla. Y aquí os dejo una imagen más del diseño.
_______________________________________________________________________________________________________________________________

To finish, my choice was filling a nail with diamonds. First, I applied a coat of ‘Confetti’ from Ciaté London- a silver glitter- and before it dries I added each of the tiny diamonds using a dotting tool. Here you can see the result. 

¿Qué os ha parecido este nail art? Pienso que es una combinación muy dulce y alegre. No olvidéis en visitarnos en nuestro Instagram (@nailavengers) para ver más imágenes de nuestros nail arts y conocer más de las Nail Avengers. El próximo miércoles manicura con @mireieta_nails, ¡no dudéis en pasaros! Seguro que os sorprende con otra de sus originales y perfectas manicuras.
_______________________________________________________________________________________________________________________________

So, what’s your opinion about this nail art? Do you like it? I find it is such a sweet and shiny combination. Don’t forget visiting us on Instagram (@nailavengers) to see more feed of our nail art and to know more about the Nail Avengers. Next Wednesday @mireita_nails will be posting a mani. Don’t miss it! I’m pretty sure she will surprise you all with another of her original and perfect manis.


Laura S.

Nail art | Vampy roses.

21.9.15

¡Hola a todos!

Me presento, me llamo Laura, vivo en Barcelona y soy la nail artist detrás del blog Wicked Fullmoon. Soy diseñadora gráfica, me encanta muchísimo el ámbito del diseño web y la ilustración. Soy adicta al café y al chocolate, y a muchas otras cosas como los videojuegos, las películas y series de dibujos...
Pero para conocerme mejor tendréis que ir siguiendo mis nail arts, pues a menudo hago de mis uñas lienzos para dibujar las cosas que me gustan o me representan. Para este primer nail art he decidido usar unos vinilos nuevos en forma de rosa. ¡Vamos a verlos!
_______________________________________________________________________________________________________________________________

Hi everyone!

I'd like to introduce myself, my name is Laura, I live in Barcelona and I'm the nail artist behind the blog Wicked Fullmoon. I am a graphic designer, my favourite field about it is web design and illustration. I'm a coffee and chocolate lover, and I'm such a fan of videogames and animated movies or tv shows...
But if you want to know more about me I'm sure you'll discover a few things looking at my nail arts, I see my nails as canvas where I draw things I like or represent me. For this first nail art I decided to use some new roses shaped vinyls. Let's see them!

¿A que son preciosos estos vinilos? Me los enviaron desde ELYT (Los tenéis en su web y podéis usar mi código WICKEDFULLMOON para un 10% de descuento en pedidos superiores a 20€) y me enamoré cuando los ví, era necesario usarlos hahaha. A pesar de que no tengo mucha experiencia usando vinilos (solo he usado los de Whats Up Nails anteriormente) he de decir que estos son muy fáciles de usar.
_______________________________________________________________________________________________________________________________

Don't you think the vinyls look beautiful? They were sent to me by ELYT (You have them on their website, and if you like you can use my code WICKEDFULLMOON for a 10% off your order over 20€) and I fell in love as soon as I saw them, I was in need of using them haha. Besides the fact that I don't have many experience using vinyls on my nails (I've only used the ones from Whats Up Nails before) I have to say that these ones are very easy to use.

Lo primero que hice fue aplicar base en todas las uñas y pintar dos de ellas con un esmalte negro cubriente cómo el que os enseño en la foto (Kind of black de Colour Alike). Ahora viene un paso importante: poner top coat en las uñas dónde vayamos a colocar el vinilo, intenté hacerlo sin y se llevo la base al retirar el vinilo y creerme, no queda tan preciso haha.
Después colocamos nuestros dos colores en una esponja de maquillaje, en mi caso negro y rojo, de forma circular y damos toques en la uña como en un degradado normal. Antes de que se seque el esmalte retiramos el vinilo con cuidado.
_______________________________________________________________________________________________________________________________

First of all we need to apply a base coat in all our nails and paint two of them with a opaque black nail polish like the one on the photo (Kind of black from Colour Alike). Next comes a very important step: apply a top coat on the nails where you wanna place the vinyls, I tried to do it without and the base coat came off when I removed the vinyl, believe me it doesn't look right haha.
After that we place our two colours on a makeup sponge, in my case black and red, in a radial shape and we put it on our nails in the same way we'll do with a normal gradient. Remember you have to remove carefully the vinyl before the nail polish dries!

Lo único que nos queda es una capa de top coat para sellar nuestro diseño y hacer que el nail art nos dure más tiempo, en mi caso usé mi amado Poshé, un top coat brillante de secado rápido para las más impacientes ;).
¡Y eso es todo por hoy! ¿Qué os ha parecido el diseño, os gustan los vinilos? Si os ha gustado no os perdáis el próximo nail art en manos de María el miércoles ♥.
_______________________________________________________________________________________________________________________________

The only thing that is left is to apply a top coat to seal our design and make it last longer on our nails. I used my loved Poshé, a glossy fast drying top coat for those impatients like me ;)
And that's it for today! What do you think of the design? Did you like the vinyls? If you like it make sure you don't miss next nail art on wednesday with the amazing Maria ♥.


Laura W.