Halloween Nails 2015 | Witch's Haunted House

7.10.15

¡Holaaaa!

Como ya os comentó Laura W. en el post anterior, las NailAvengers nos hemos unido al reto Halloween Nails 2015 que ha organizado Marta. Cada semana hay una nueva temática hasta el día de Halloween, y esa misma semana habrá tres propuestas diferentes (copio/pego su explicación jijiji).
Esta semana nos toca el tema ''brujas''. ¿Preparad@s?
______________________________________________________________________________________________________________________________

Helloooo!

As Laura W. said in the previous post, the Nail Avengers decided to join the Halloween Nails 2015 challenge that Marta organised. Each week there will be a new theme until the Halloween day, and each week you'll have three different nail arts (copy/paste from Laura's explanation hahaha). This week's theme is ''Witch'', Ready?
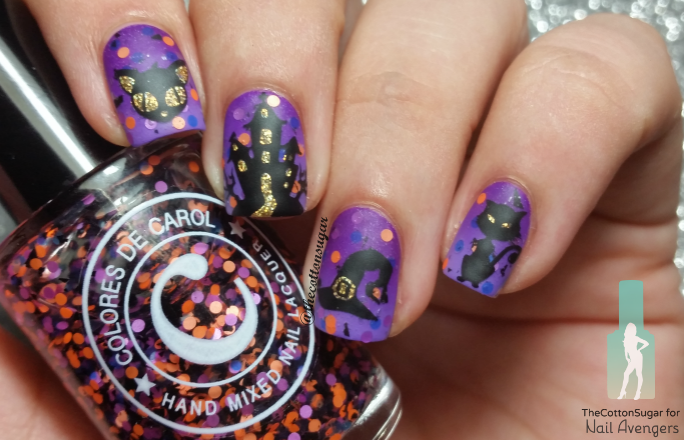

Para este post he decidido hacer un poquito de stamping + degradado, dos de mis técnicas preferidas jajaja. Los dibujos son un poco random, aunque todos tienen que ver con brujas y Halloween ;) hay gatos negros, un sobrero de bruja y casas encantadas. No se porqué, pero ¡me encanta Halloween! ¿Y a vosotr@s? He hecho una versión brillante y otra mate.
______________________________________________________________________________________________________________________________

For this post I've decided to make a little bit of gradient + stamping, two of my favorite techniques hahaha. The images are random, but they're Halloween and witches related ;) there are two black cats, a witch hat and two haunted houses. I don't know why, but I love Halloween! And you? I've done a glossy version and a matte version.


Os cuento un poquito los productos que he usado. Los esmaltes son: Color Club ''Pucci-licious'', ''Disco Dress'' (de ELYT), Colores De Carol ''Cheshire'', ''80's Fever'', F.U.N Lacquer ''Million Dollar Dream''  y el negro de estampar el ''Black'' de MundoDeUñas. El estampador y la placa de estampar ''Halloween 01'' son de UberChicBeauty, para proteger alrededor de la uña he usado MessNoMore ''celo liquido'' o latex. Como es un diseño un poco más elaborado de lo normal, haré un tutorial para instagram (@thecottonsugar). Os dejo por aquí abajo códigos de descuento para algunas de las webs que he mencionado:

  • MESS NO MORE! liquid latex de Minimanimoo: Con mi código ''COTTONSUGAR'' tendréis un descuento de 2$ en vuestro Mess No More! 
  • ColoresDeCarol: Con mi código ''COTTONSUGAR'' tendréis un descuento del 10% en vuestra compra.
  • ELYT: Con mi código descuento ''THECOTTONSUGAR'' tendréis un descuento del 10% en vuestra compra superior a 20€.
______________________________________________________________________________________________________________________________

Let's talk about the products I've used. The colors are: Color Club ''Pucci-licious'', ''Disco Dress'' (from ELYT), Colores De Carol ''Cheshire'' and ''80's Fever'', F.U.N Lacquer ''Million Dollar Dream'', and the blanck stamping polish is from MundoDeUñas. The stamper and stamping plate ''Halloween 01'' are from UberChicBeauty. I'll post a tutorial on my instagram soon (@thecottonsugar). These are some discount codes for some of the webs I've mentioned, feel free to use them ;)

  • MESS NO MORE! liquid latex from Minimanimoo: Use my code ''COTTONSUGAR'' for 2$ off at WWW.MINIMANIMOO.COM
  • ColoresDeCarol: Use my code ''COTTONSUGAR'' fro 10% off.
  • ELYT: Use my code ''THECOTTONSUGAR'' for 10% off (orders over 20€)


Bueno, ya veis que es un poco random. Os dejo un macro de la casa encantada, por si quereis pasar a ver la distribución de las habitaciones, está en alquiler jajaja.

¿Qué os parece? ¿Qué opináis de Halloween? Bueno, espero que os guste y que os paséis el viernes por aquí para ver el precioso diseño de Fama  ;) ¡Un beso brujil!

*Quiero dar las gracias a mis amigas por ayudarme con los posts, especailmente a Laura W., que tiene una paciencia de santo jaja.
______________________________________________________________________________________________________________________________

Well, as you can see is a random design. I leave a macro of the haunted house, if you wanna go inside and see the distribution of the rooms... it is for rent LOL.

Do you like it? what do you think about Halloween? I really hope you like it! and don't forget to check out Fama's post on Friday ;) A witchy kiss!

*I wanna thank my friends for helping me with the posts, specially Laura W., who has the patience of a saint. 


María.

Halloween Nails 2015 | Elphaba got her nails done.

5.10.15

¡Hola a todos!

Hace relativamente pocos días las Nail Avengers decidimos apuntarnos al reto Halloween Nails 2015 que ha organizado Marta. Nuestro primer reto juntas, y la verdad es que nos hace mucha ilusión ♥. Cada semana hay una nueva temática hasta el día de Halloween, y esa misma semana habrá tres propuestas diferentes. El tema para nuestras uñas esta semana es brujas, espero que estéis preparados para algunos nail arts espeluznantes haha.
¡Vamos con mi manicura de bruja!
______________________________________________________________________________________________________________________________

Hi everyone!

A few days ago Nail Avengers decided to join the Halloween Nails 2015 challenge that Marta organised. It's our first challenge together, and we're super excited to share our nails with you ♥. Each week there will be a new theme until the Halloween day, and each week you'll have three different nail arts. For the first week the theme is witches, so I hope you're ready for some spooky nails, haha.
Let's see my witch nails!

¿Qué pasa cuando Elphaba, la bruja de Wicked (O la de Mago de Oz) va a que le pinten las uñas? Pues estoy segura de que pide que le hagan un nail art así, sencillo pero que vaya con su personalidad. No hay nada que quede mejor con una piel de bruja verde que un esmalte negro, pero todas sabemos que hay que ser un poco más original, por eso se ha atrevido con un degradado de verde lima a negro, con un toque de glitter verde.
______________________________________________________________________________________________________________________________

Do you know what happens when Elphaba, the witch from Wicked (or the Wizard of Oz) goes to have her nails done? I'm pretty sure that she asks for a nail art like this one, simple but that goes with her personality. There's nothing like black nail polish for a witch with a green skin, but some of us like to be a little more original than plain nail polish. That's why she went for a lime green to black gradient with a touch of green glitter.

Me ha contado que se quedó con todos los detalles mientras le hacían el nail art, para después poder recrearlo ella en casita. Los tres esmaltes que usaron para el degradado fueron: Mojito de Ciaté, 496 de la colección PZN de Colour Alike, y el Kind of Black de Colour Alike también. Tras pintar todas sus uñas con el verde lima pusieron los tres colores en ese orden en una esponjita de maquillaje y dieron toques suaves encima.
______________________________________________________________________________________________________________________________

She told me that she paid atention to every detail while they painted her nails, that way she could recreate it with her own polishes at home. The polishes they used to do the gradient are: Mojito from Ciaté, 496 of the PZN collection from Colour Alike and Kind of Black from Colour Alike. After painting all her nails with the lime green, they put the three colours over a make up sponge and dabbed lightly over her nails.

Finalmente añadieron el glitter que veis en la foto desordenadamente sobre la punta de las uñas, dónde quedaba el negro del degradado, para darle un aspecto más brillante y mágico. Le encantó tanto que se llevó el glitter a casa para descubrir dónde más podía utilizarlo. ¡Por cierto! Un detalle muy muy importante con el que se quedó es aplicar top coat después del degradado y del glitter, así hacemos el nail art más duradero y el glitter quedará integrado con el resto.

¿Qué os ha parecido el nail art? ¿Ideal para una bruja un poco más moderna? Espero que os haya gustado la idea y no dejéis de pasar por el blog, el miércoles habrá otro nail art brujil de María. ¡Que paséis buena semana!
______________________________________________________________________________________________________________________________

Finally they added the green glitter you can see on the photo, they did it in a messy way on the tip of the nails, where the black of the gradient is. It gives it a shiny and magical look, don't you think? She loved it so much that she took the glitter home to discover where could be used. By the way, a very very important detail that she remembered... You have to apply top coat after the gradient and the glitter to make the nail art last longer, and also to settle in the glitter with the rest.

What do you think of the nail art? Do you like it for a modern witch? I hope you liked the idea and don't miss wednesday post, there will be another witchy design by Maria. Have a great week!


Laura W.


Nail art | Welcome back dark polishes!

2.10.15

¡Wola!

¡Por fin está aquí el otoño! :)  Cómo me gusta esta época del año...vuelvo a rescatar mis esmaltes oscuros del cajón y, sin saber por qué, recupero mi obsesión por los tonos burdeos.
Hoy os traigo esta manicura que, siendo sincera, para mí ha sido un reto por que he utilizado... ¡vinilos! Esos súper villanos que son capaces de arruinar cualquier manicura en cuestión de segundos.
______________________________________________________________________________________________________________________________

Hey there!

Fall is finally here! :) I love this time of the year... I start using dark tones again and, without any known reason, I get back into my obsession for dark red/burgundy tones.
Today I want to share with you this design that, to be honest, has been a challenge for me because I've used... vinyls! Vinyls are on my super villains list because they are capable to ruin a manicure in seconds.


Me encantó la combinación de un negro con purpurina muuuuy finita y el estampado en acabado crema. Tengo claro que repetiré este diseño en más de una ocasión.

Bueno, empecemos con los esmaltes que he usado. El color negro de base es el IsaDora Velvet Matt Nails 825 Black Caviar. Es negro con unos reflejos brillantes muy bonitos y con acabado mate (¿alguna amante del acabado mate por aquí? Aparte de mí, claro! Jejeje).

En la macro le he puesto un top coat brillante para que veáis bien los reflejitos que os digo y, no sé si opináis como yo pero... si mate es bonito, con acabado brillante ya es impresionante.

El tono burgundy es IsaDora Gel Nail Lacquer 248 Dark Tempation.
_______________________________________________________________________________________________________________________________

I really loved the combination of this shimmery black with the burgundy. I will repeat this design more times for sure!

Well, let's start with the polishes I've used. The black base is IsaDora Velvet Matt Nails 825 Black Caviar. It's a gorgeous shimmery black with a matte finish (say HI if you're a matte lover like me!). 

I've used a glossy top coat to take the macro shot to show you the amazing shimmer and how gorgeous this polish look no matter what finish you choose.

The burgundy one is IsaDora Gel Nail Lacquer 248 Dark Temptation.


Los vinilos son de ELYT (Entre lazos y telas), hay una variedad inmensa de estampados y éstos concretamente me gustaron mucho :).

Bueno, y os preguntaréis... ¿por qué ha sido un reto para ti? Pues por que todo lo que no sea usar el pincel, se convierte en algo complicadísimo para mí jaja. Pero ahí van unos consejitos para las que tengáis alguna dificultad usándolos:
1. No uséis una base peel off debajo del esmalte... arrancaréis todo el diseño cuando estiréis del vinilo.
2. Entre la base y el vinilo, usar un top coat de secado rápido, y dejad que se seque del todo!
3. Aún con el top coat, si veis que el vinilo pega mucho, presionarlo un par de veces contra vuestra mano. Ojo, no os paséis con este paso o entonces no se pegará bien a la uña.
4. Si el esmalte que vais a usar encima del vinilo es muy líquido o muy espeso, mejor usar una esponjita para aplicarlo, como si estuvierais haciendo un gradiente.
_______________________________________________________________________________________________________________________________

Vinyls are from ELYT (Entre lazos y telas), there is a huge variety of them but these one immediately got my attention.

Well, you maybe are wondering ... why it has been a challenge for you? Most of techniques different than freehand are a challenge for me haha. Here are some tips just in case you have difficulty using them too:
1. Do not use a peel off base under the polish... you will take off the entire design when you pull off the vinyl.
2. Between the base and the vinyl, use a fast drying top coat and let dry completely!
3. Even if you let the top coat dry, if you see that the vinyl sticks so much, press it a few times against your hand. Be careful, do not repeat this step too many times or then the vinyls won't stick to your nail.

4. If the polish that you are going to put over the vinyl is too liquid or too thick, better use a sponge to apply it just as if you were making a gradient.


Bueno, espero que os haya gustado y, como siempre, si tenéis alguna pregunta o simplemente queréis decir "hola", me encantará leeros!
_______________________________________________________________________________________________________________________________

Well, I hope you like it and, as always, if you have any question or you just want to say "hi", I will love to read it!


Judit
<3